Direct access to key fish information
Sometimes when you’re validating a fish transect, you get a warning that an observation' size exceeds the recorded maximum length for a species. In MERMAID Version 2.6, you can view that species' properties directly while inputting data, so you can quickly decide whether to amend or ignore. A book icon will appear to the right of the Fish Name field when you enter a fish. If you click the book icon, all important information you need will appear specifically for that fish species (or genus, or family). These fish properties match the ones in the Reference xlsx that you can download from the main menu in the app.

The fish properties displayed vary by taxonomic level. For a species, MERMAID will show you which fish family it belongs to; the biomass constants A, B, and C for that species; max length recorded, group size, functional group, and trophic group. If you enter a genus, MERMAID will display the fish family it belongs to and the biomass constants A, B, and C for that fish genus. If you enter a family, MERMAID will display biomass constants A, B, and C for that family. This feature will help you to quickly view necessary information without having to download and open the Reference xlsx file, and search for the fish species/genera/family.
Retain observers who are no longer part of the project
In previous versions, when editing a submitted sample unit where an observer was subsequently removed from the project, the observer was no longer listed in the observers list, requiring you to choose another observer in order to re-submit the transect. In Version 2.6, you can retain the same observer without making changes on the Observers field. A note that the observer has been removed from the project will appear under the Observers field. This feature helps you to detect observers who are no longer in your project more easily.

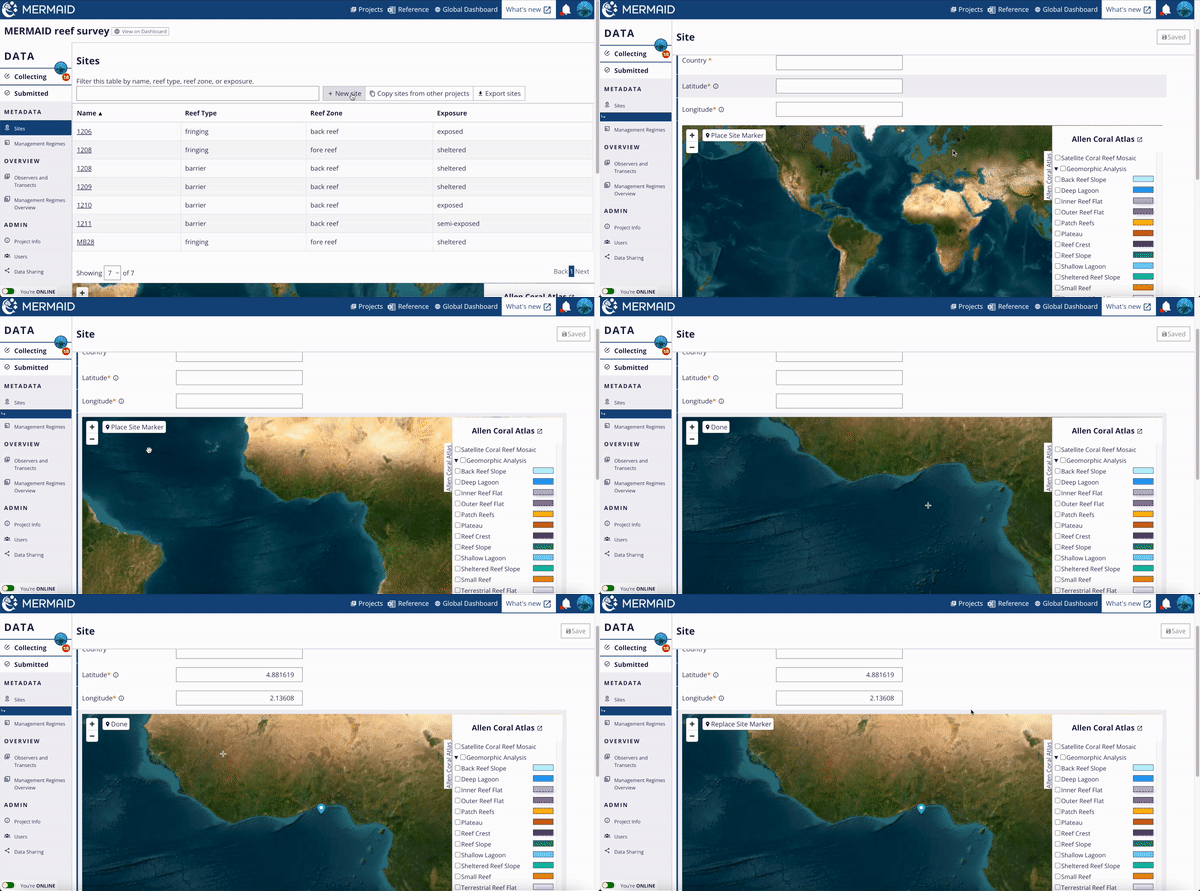
Click on the map directly to add new site
MERMAID Version 2.6 added a new feature that allows you to directly click on the map to add a new site. In previous versions, you needed to type the coordinates first, then move the point to the right location. Now, you can click directly on the map. This feature will help especially in cases in which you are exploring new sites in the field. To use this new feature:
Go to the Sites page
Click “+ New site” to create a new site
Scroll down until you see the map and zoom in to your desired location
Click the “Place Site Marker” button on the top left of the map, then place the marker to the intended location on the map
Once you’re sure, click the “Done” button. The coordinates will be filled automatically based on where you placed the marker.

