Managing your projects
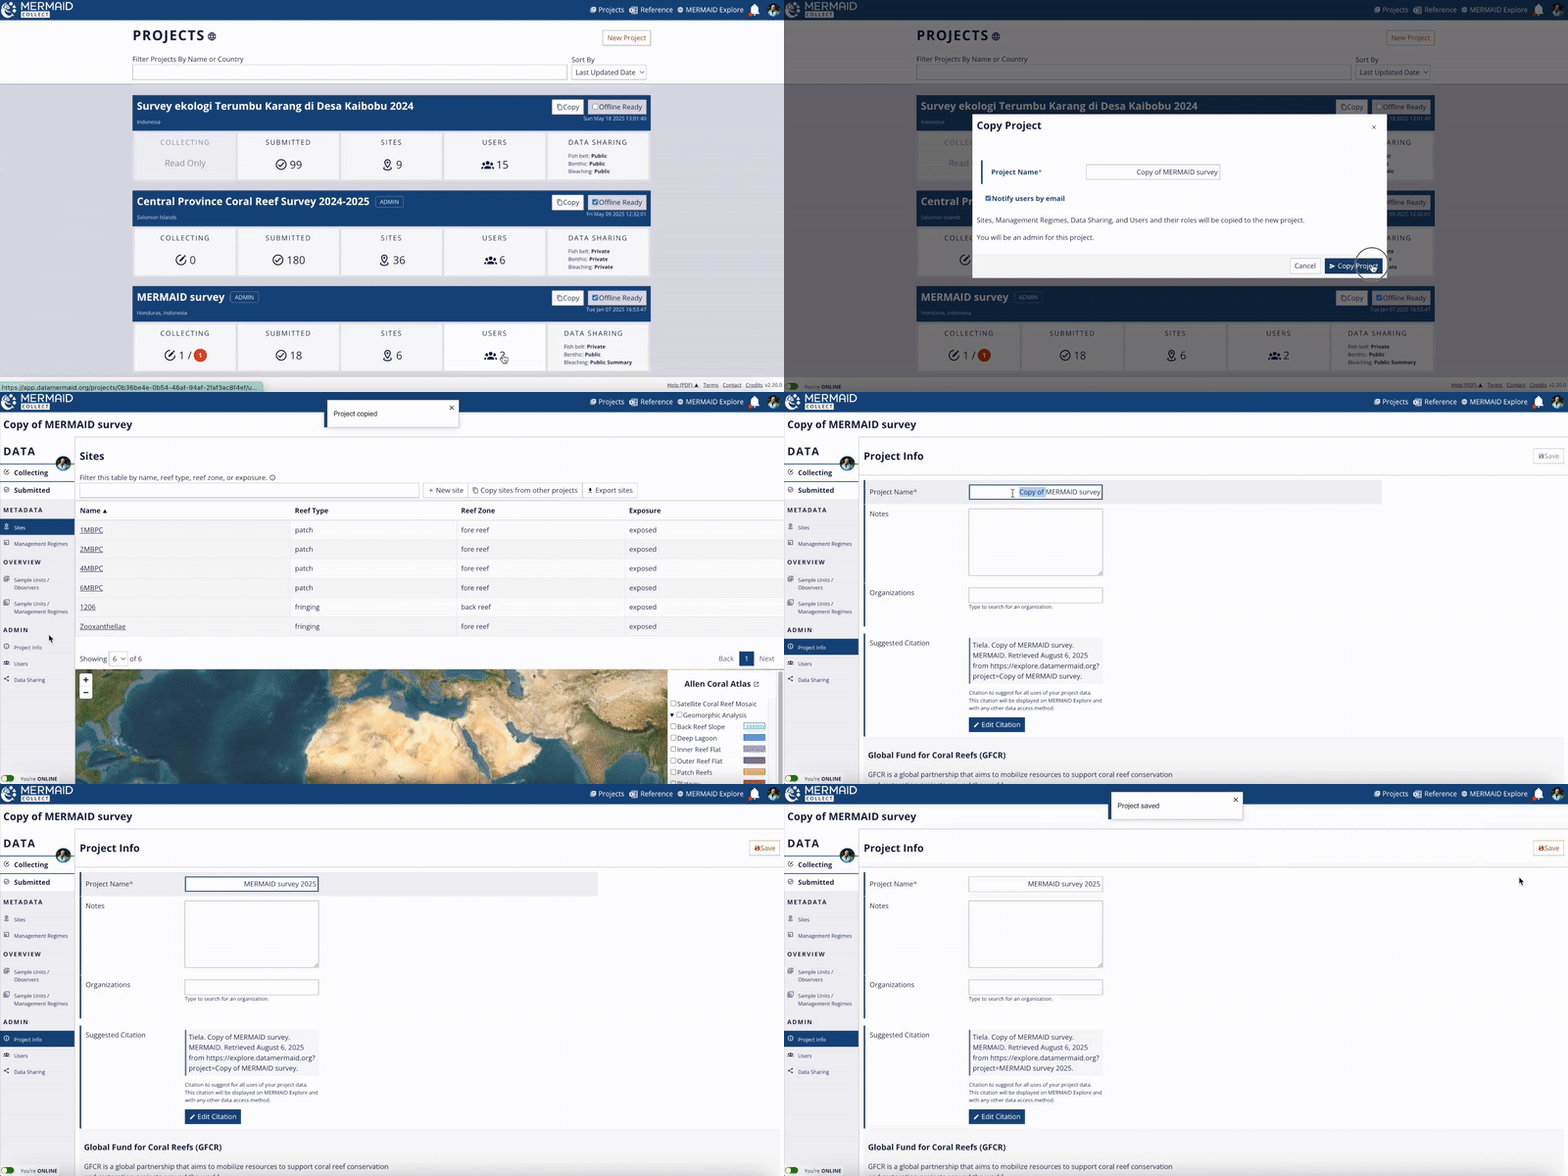
The Projects page is your main space where you’ll find every project you’re part of—whether you're a user with an Admin, Collector, or Read-only role.
At a glance, you’ll see key stats for each project:
Number of unsubmitted and submitted sample units
Sites
Users
Data sharing policies selected per survey method
If you have an Admin role, you'll see an Admin tag by the project name.
You can also check whether a project is enabled for offline use by inspecting the Offline ready box in each project card.

Quick navigation to projects
You can hop into your Projects page anytime by clicking MERMAID Collect at the top left or the Projects tab in the top menu. Want to jump right into collecting data or managing users in a project? Each section on a project card on the page links directly to tabs:
Collecting
Submitted
Sites
Data sharing
This gives you one-click access to the sections you need to keep your project moving.
Copying projects
Running a repeat survey or working with different stakeholders like donors who require separate datasets? Use the Copy button on a project card to create a new project with the exact same setup as the existing one—no need to rebuild it from the ground up.
This is ideal for:
Seasonal or annual survey cycles
Projects tied to different funding sources or partners
Cases where data must be kept separate due to sharing restrictions
Copying a project preserves its structure—project info, users, organizations, sites, management regimes, and data sharing settings—so you can get started faster and stay consistent across projects.
Clicking Copy duplicates the project’s:
Project info
Organization(s)
Users and their roles
Data sharing policies
Sites
Management regimes
This saves time and ensures consistency across projects—especially useful when managing surveys across multiple years or regions.

Filtering and sorting projects
On the Projects page, you can easily find the project you’re looking for:
Filter projects by name or country using the search field labeled Filter projects by name or country.
Sort projects using the dropdown menu next to the filter field. You can sort by:
Last updated date
Project name
Country
Navigating to MERMAID Explore
From the Projects page, you can jump straight into MERMAID Explore while staying logged in.
Simply click MERMAID Explore in the top-right corner of the page, or click the globe icon next to the PROJECTS title.
Downloading References
Need MERMAID’s list of fish and benthic attributes? You can download the latest Reference file directly in the top-right corner of the Projects page.
Project notifications
Stay up to date the notification bell in the top-right corner of the Projects page.
A red dot indicates there are new notifications, such as:
Project changes
MERMAID product updates or feature releases
Click Dismiss all notifications to clear them once reviewed.

Managing data in a project
Once you’re inside a project, MERMAID makes it easy to track progress of data collection and pinpoint where your team’s attention is needed.
The OVERVIEW section provides a high-level snapshot of your project's status—so you can quickly monitor survey progress, check for missing submissions, and ensure data consistency across your sites. It includes two tabs:
Sample units / Observers
This tab shows what data has been submitted—and what’s still pending. You can filter the table by site or method and sort the table based on site and/or method.
For each site and method, you can:
View individual submitted sample units under Submitted on the table’s left side. This column will only appear if there is at least one submitted sample unit in a project.
View individual unsubmitted sample units for each user under Collecting on the table’s right side.
Hover on any sample unit number to view additional details like last editor, observer(s), site name, management regime, and survey date.
Click View submitted sample unit to jump directly into the submitted data.
Best for: Following up with team members on any missing or unsubmitted sample unit. |

Sample units / Management regimes
This tab organizes submitted sample units by management regime—helping you verify governance-related data accuracy. You can filter the table by site or method and sort the table based on site and/or method.
Note that only management regimes with submitted data will appear.
For each site and method, you can:
View individual submitted sample units by management regime
Click on any sample unit number to jump directly into the submitted data.
Best for: Reviewing and verifying that each sample unit has the correct management regime assigned for the right site and date. |

Filtering sample units
To focus your review, both tabs include filter options at the top so you can narrow the sample units shown by site and method.
You can filter by:
Site – Enter the site name in the Filter this table by site field (top left)
Survey method – Select the method from the Filter method dropdown (top right)
As you apply filters, the sample unit totals update automatically—giving you real-time feedback on your data view.