1. Saving a sample unit
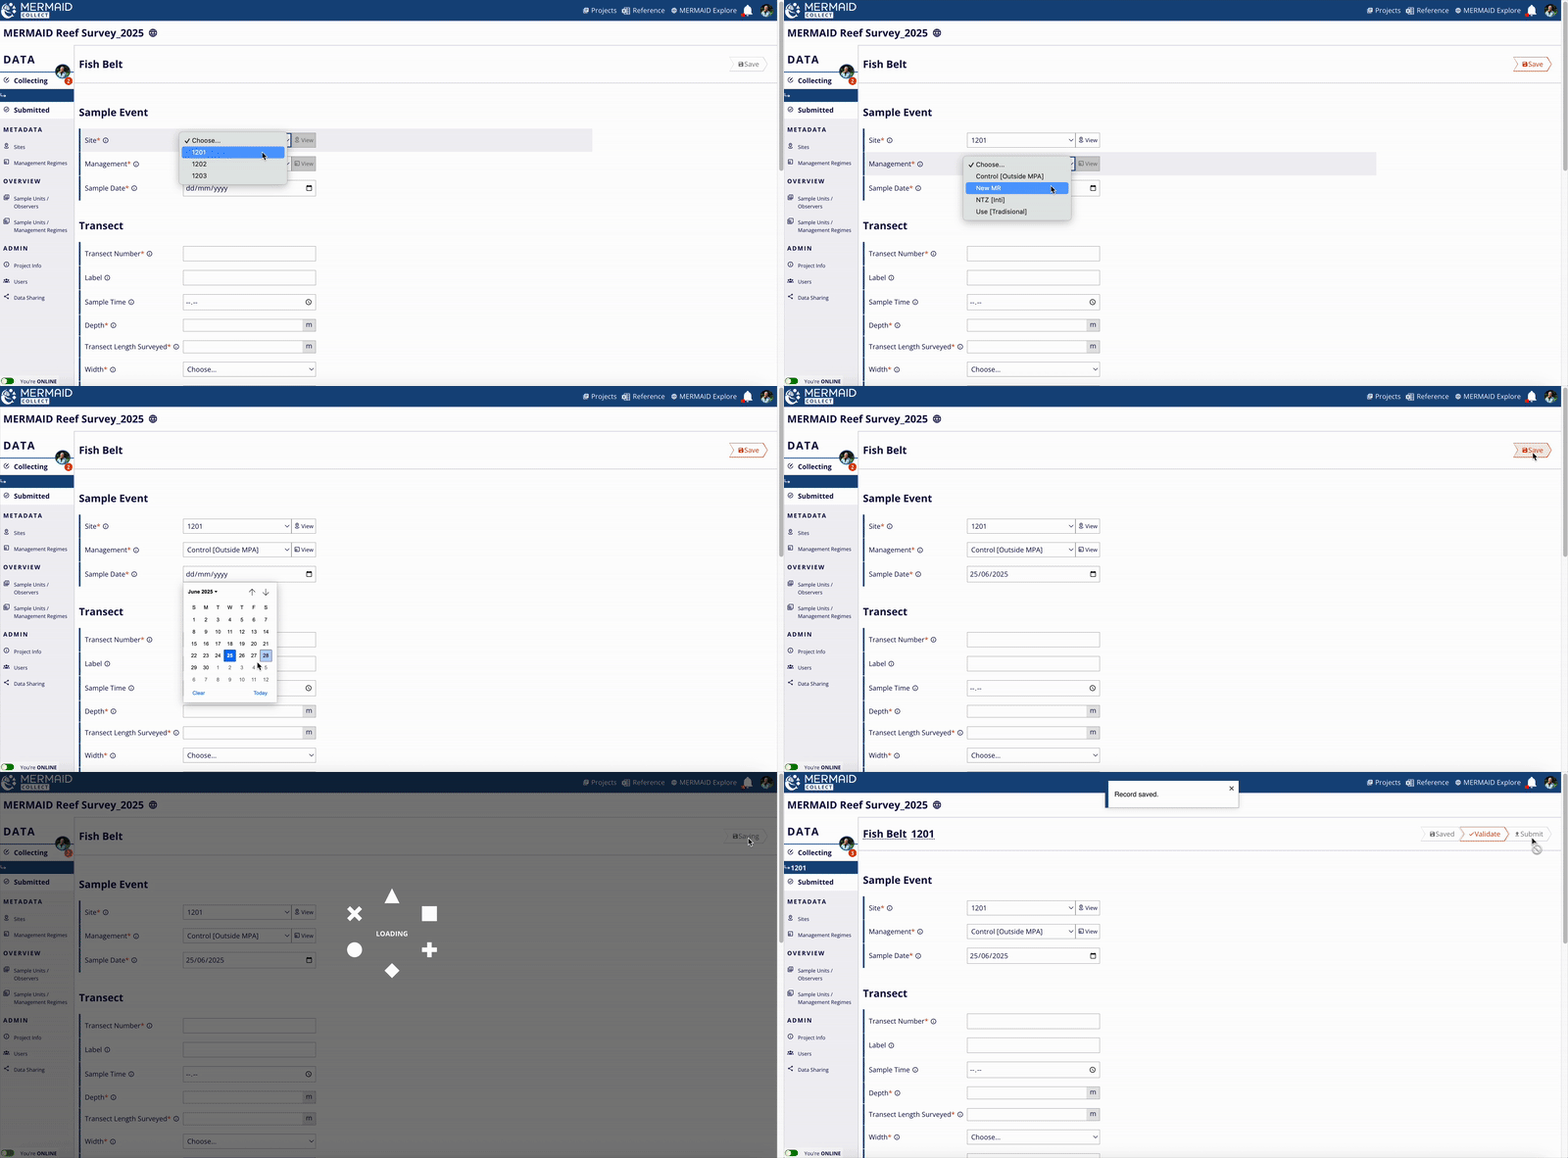
Saving your work regularly is essential while collecting data in MERMAID Collect. Whether you're online or offline, all sample units are saved locally to your computer to ensure nothing is lost.
Here’s how saving works:
When you enter new information into a sample unit, the Save button in the upper-right corner will turn bright red.
Click the bright red Save button to save your progress.
Once saved, the button will turn gray and display the label Saved, indicating there is no new data to save.

You can always return to any saved sample unit later to add or change data, then save again.
Automatic prompts for unsaved data
If you try to navigate away from a page with unsaved changes:
MERMAID will show a warning message that you have unsaved data.
Select Cancel to remain on the page and save.
Select OK to leave the page without saving your recent changes.
2. Validating a sample unit
After saving your data in a sample unit, the next step is to validate it. Validation is like proofreading your data—it helps catch common errors, inconsistencies, missing observations or outliers before submission.
Reminder: Validation and submission can only be done online. You will not see the Validate and Submit button when offline. |
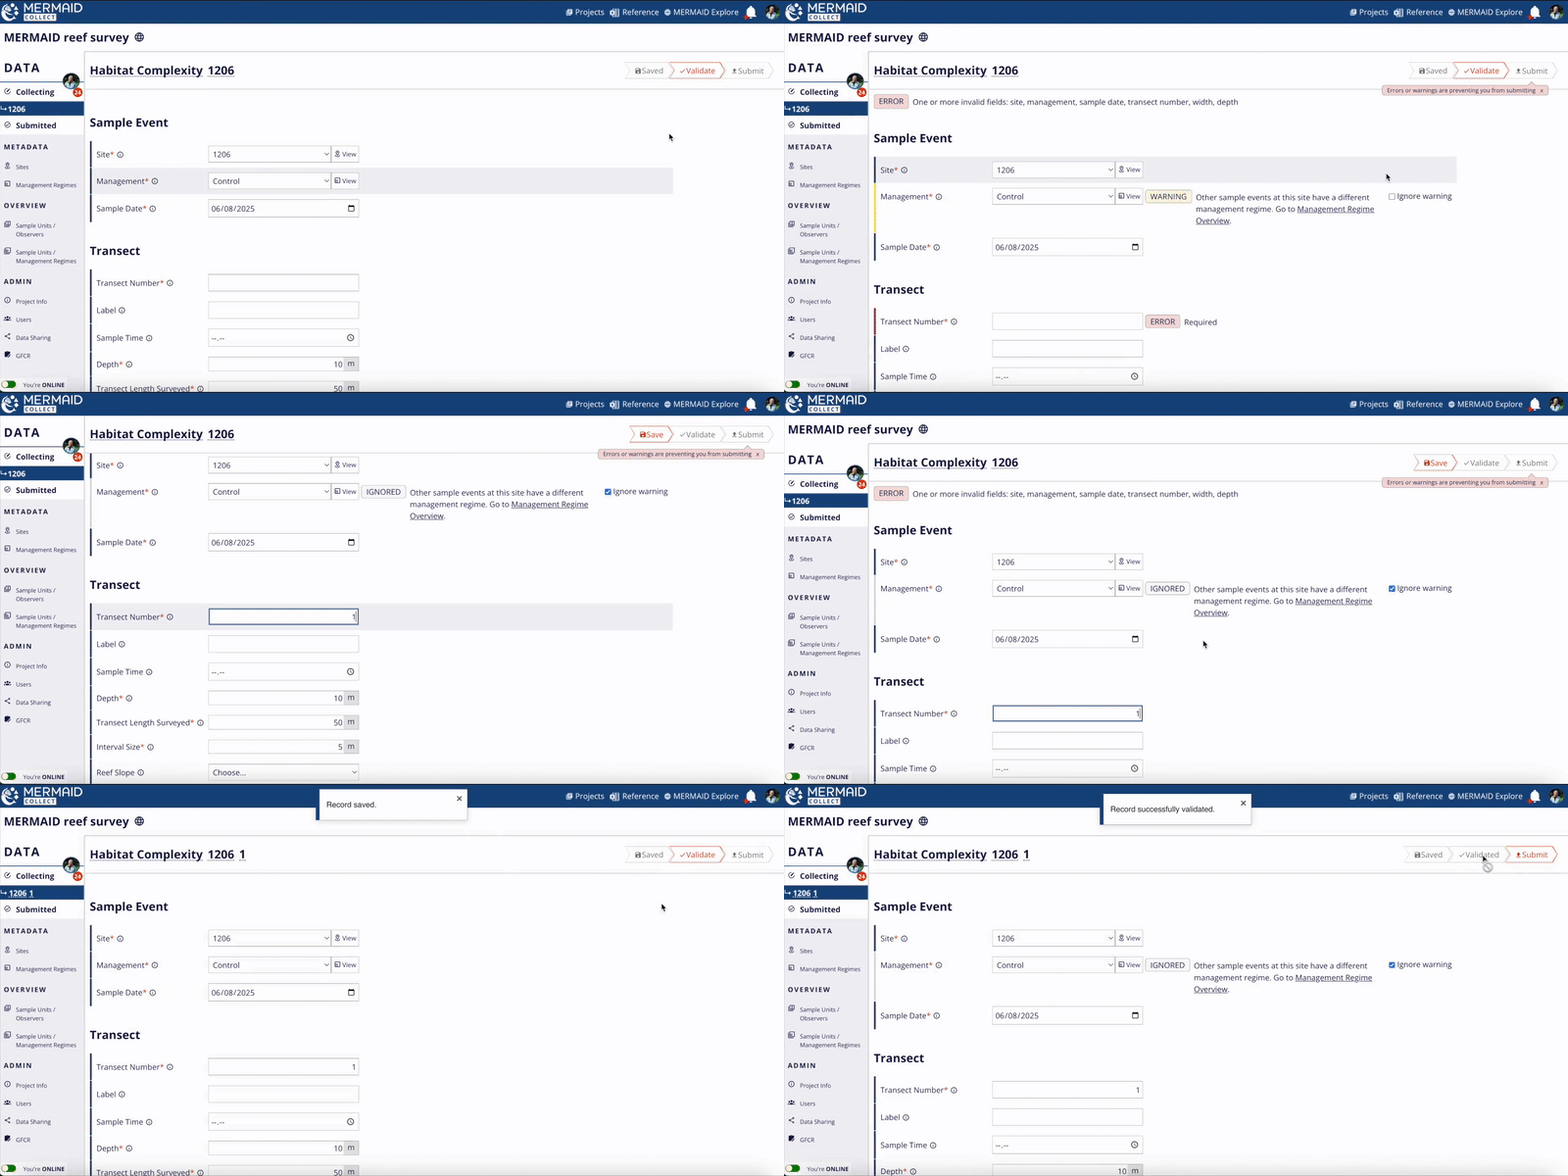
After saving your sample unit, the red Validate button becomes visible next to the Saved button at the top of the page. Click in Validate to start your validation. MERMAID will run automated checks across the form and observations. Once completed, the validation will either be successful or flag warnings and/or errors in your sample unit.
If validation is successful
Your sample unit has no issues. The Submit button will now be active in red, and the Validate button will be grayed out. Your sample unit is ready to be submitted.

If validation flags warnings and/or errors
A red message Errors or warnings are preventing you from submitting will appear under the Submit button if any issues are detected.
Warnings and errors are displayed in three places to help you quickly find and fix them:
At the top of the page
Next to affected fields or rows (highlighted in yellow for warnings and red for errors)
In the Validations column in the Observations table, if there are any issues with the observations.
Tip: Click Scroll to observations next to any message to jump directly to the affected row or field. |
How to resolve warnings and/or errors
Warnings indicate unusual but possible data (e.g., an unusually large fish or unexpected coral genus).
You can either:
Resolve the warning by editing the data field or using the Resolve button next to the field.
Ignore the warning by checking the Ignore warning box next to it or on top of the page next to the warning message, if your data is correct.
Errors indicate missing or invalid data (e.g., a required field left blank, an invalid value). These must be fixed before a sample unit can be submitted. Errors are marked clearly in red next to affected fields.
To resolve:
Scroll to the error(s).
Make the necessary correction(s).
After making changes, save and revalidate to confirm that the warning(s) and/or error(s) has been addressed. Repeat the process until all errors are cleared.
Each sample unit’s validation status is visible on the left side of each sample unit row in the Collecting page. Use this status to keep track of progress and know which units need attention. Read more in How Data Collection Works.
Tip: Click Scroll to observations at the top of the page to quickly locate issues in the sample unit form. |

Each sample unit’s validation status is visible on the left side of each sample unit row in the Collecting page. Use this status to keep track of progress and know which units need attention. Read more in How Data Collection Works.
Common warnings and error messages
Below are some of the most common warnings and errors you might encounter, and how to address them—organized by survey method.
Survey method | Type of validation | Message | How to fix it |
Across methods | Warning | Fewer than 5 total observations | Review the Observations table and add any missing observations if this was an error; or ignore the warning if this reflects real field conditions. |
Warning | Coral or fish not previously observed in site region | Confirm species ID and spelling in the Observations table. If correct, ignore the warning. | |
Warning | Other sample events at this site have a different management regime. Go to Management Regime Overview. | Review the management regime for the site in the Sample Unit / Management Regimes table. If correct, ignore the warning. | |
Error | One or more invalid fields: site, management, sample date, transect number, depth, transect length, observers | Check that all required fields in Sample event and Transect/Quadrat collection are filled correctly and completely. | |
Error | Incorrect number of observations; expected/Number of entered rows doesn’t match expected number of points | Confirm transect length and interval size in the Transect section. Adjust observation rows to match (e.g., 10 m long transect with a 0.25 m interval size = 40 expected observation rows). | |
Fish belt | Warning | Total biomass less than 50 kg/ha | Double-check species names, fish sizes, and counts in the Observations table. Ensure belt width and transect length are entered; or ignore the warning if this reflects real field conditions. |
Warning | Total biomass greater than 5,000 kg/ha | Check for data entry errors in the Observations table—especially very large fish sizes or high counts; or, ignore the warning if this reflects real field conditions. | |
Warning | Total fish count less than 10 | Add any missing fish observations in the Observations table, or, ignore the warning if this reflects real field conditions. | |
Warning | Fish size is larger than maximum observed size | Verify fish size is realistic in the Observations table. Adjust if entry was a mistake. | |
Error | One or more invalid fields: width, fish size bin | Choose valid dropdown options. Do not leave required fields blank in the Transect section. | |
Error | Invalid fish size | Enter a valid numeric fish size in cm, consistent with the size bin in the Observations table. Avoid decimals or unusual formats. Do not leave size fields blank. | |
Benthic PIT | Error | One or more invalid fields: interval size, interval start | Check that numeric values are entered correctly and logically, in m. Do not leave required fields blank in the Transect section. |
Benthic LIT | Error | Total observation lengths ≠ transect length | Sum your observation lengths in the Observations table and adjust as needed to match the entered transect length; or adjust transect length to match the sum of your observations lengths in the Transect section. |
Benthic photo quadrat | Warning | Total number of points entered for quadrats does not match defined number of points per quadrat | Count all points recorded in the Observations table in each quadrat. Adjust observations so the total matches the points per quadrat defined in the Transect section. |
Warning | Defined number of quadrats does not match count of quadrats in observations | Check the total number of quadrats in the Observations table. Add or remove observations so that the number of unique quadrats matches the number you entered in the Transect section. | |
Warning | Missing quadrat numbers | Ensure that all observations have a Quadrat number in the Observations table. | |
Error | One or more invalid fields: quadrat number start, number of quadrats, quadrat size, number of points per quadrat | Ensure these fields are filled using valid dimensions (e.g., 0.5 m², 1 m²). Do not leave required fields blank in the Transect section. | |
Bleaching | Error | One or more invalid fields: quadrat size | Ensure this field is filled using valid dimensions (e.g., 0.5 m², 1 m²). Do not leave required fields blank in the Transect section. |
Error | Each percent cover must be a positive number, and not blank. Invalid values | Enter a positive, whole number (e.g., 0–100%). Leave no fields blank in the Observations - Percent cover table. | |
Error | Duplicate colonies bleached observations | Ensure each benthic attribute (e.g., Acropora entered twice) is listed only once in the Observations - Colonies bleached table. Remove duplicates or consolidate into a single entry. | |
Habitat complexity | Error | One or more invalid fields: interval size | Enter valid numeric interval values in m (e.g., 0.5, 1.0) in the Transect section. |
3. Submitting a sample unit
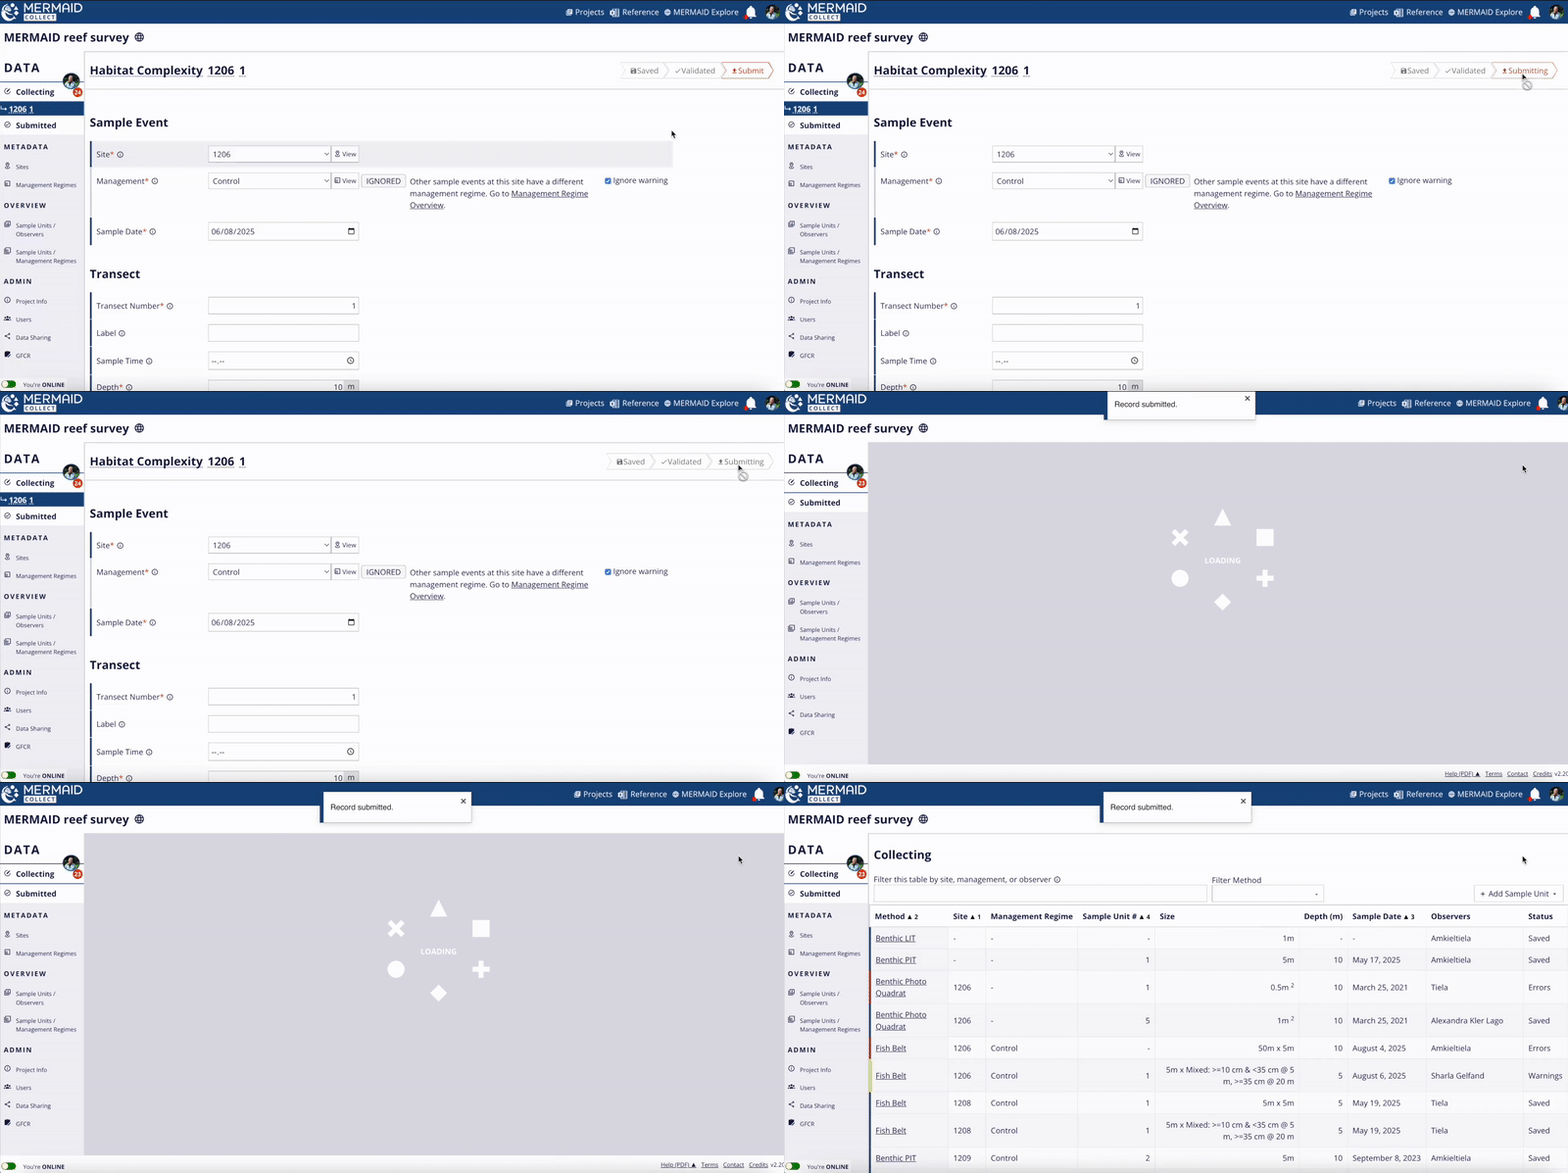
Once all errors have been corrected and warnings have been addressed (or ignored), the Submit button will become active.
Click the red Submit button to finalize the sample unit.
After submission is complete, you’ll read a message Record submitted.
Submitting moves it from your personal Collecting page to the shared Submitted page.
If you’re a Collector in the project: Submitting should only be done when your data is clean and complete. You can’t edit a sample unit after submitting it unless an Admin transfers it back to you.

4. After submission
After submitting sample unit(s), all project users can:
View and export submitted data from the Submitted page.
View it in MERMAID Explore. Click the Globe icon next to your project name to jump straight to the map view in Explore and view your submitted data. Read more in Viewing Your Project(s) Only in Using MERMAID Explore.
Access it via the MERMAID R package in R using a filter function. Read more in Accessing Project Data from MERMAID.
Only users with an Admin role can edit, unsubmit, or return a submitted sample unit to a Collector for further editing.
